... and anti-patterns.
We are going to explore helpful techniques to improve resiliency and high availability of Kubernetes deployments and will take a look at some common mistakes to avoid when working with Docker and Kubernetes.
First, follow installation instructions
The first common anti-pattern when working with Docker images, or more specifically, when writing Dockerfiles for your own images, is mixing build and runtime environments in the same image.
Let's consider this Dockerfile:
FROM ubuntu:18.04

RUN apt-get update
RUN apt-get install gcc
RUN gcc hello.c -o /hello
It compiles and runs a simple "hello world" program:
$ cd prod/build
$ docker build -t prod .
$ docker run prod
Hello World
There are a couple of problems with the resulting Docker image.
Size
$ docker images | grep prod
prod                                          latest              b2c197180350        14 minutes ago      201MB
That's almost 200 megabytes to host several kilobytes of a C program! We are bringing in package manager, C compiler and lots of other unnecessary tools that are not required to run this program.
Which leads us to the second problem:
Security
We distribute the whole build toolchain. In addition to that, we ship the source code of the image:
$ docker run --entrypoint=cat prod /build/hello.c
#include<stdio.h>

int main()
{
    printf("Hello World\n");
    return 0;
}
Splitting Build And Runtime Environments
A better way to do this is to use a pattern called "buildbox". The idea behind it is that you build a separate "buildbox" image that provides the necessary build environment to compile/build the program and use another, much smaller, image to run the program.
Let's take a look:
$ cd prod/build-fix
$ docker build -f build.dockerfile -t buildbox .
NOTE: We have used -f flag to specify the Dockerfile we are going to use. By default Docker would look for a file named Dockerfile which we also have in this directory.
Now we have a buildbox image that contains our build environment. We can use it to compile the C program now:
$ docker run -v $(pwd):/build buildbox gcc /build/hello.c -o /build/helloNOTE: If you have your local Docker environment configured to point to your local minikube cluster (via eval $(minikube docker-env) command), the command above will not work because it won't be able to mount the volume. Use your local Docker installation, you can open a new shell session for that.
Let's explore what's just happened. Instead of building another image with the compiled binary (and the program's source code) inside it using docker build we mounted the source code directory in our buildbox container, compiled the program and had the container to output the resulting binary to the same volume. If we look at our local directory now, we'll see that the compiled binary is there:
$ ls -lhNow we can build a much smaller image to run our program:
FROM quay.io/gravitational/debian-tall:0.0.1

ADD hello /hello
ENTRYPOINT ["/hello"]
$ docker build -f run.dockerfile -t prod:v2 .
$ docker run prod:v2
Hello World
$ docker images | grep prod
prod v2 ef93cea87a7c 17 seconds ago 11.05 MB
prod latest b2c197180350 45 minutes ago 201 MBNOTE: Please be aware that you should either plan on providing the needed "shared libraries" in the runtime image or "statically build" your binaries to have them include all needed libraries.
Docker supports the buildbox pattern natively starting from version 17.05, by providing a feature called multi-stage builds. With multi-stage builds you can define multiple "stages" in a single Dockerfile, each of which starts with a new FROM clause, and selectively copy artifacts between the stages. This way you only write a single Dockerfile and end up with a single resulting (small) image.
For example:
#
# Build stage.
#
FROM ubuntu:18.04

RUN apt-get update
RUN apt-get install -y gcc
ADD hello.c /build/hello.c
RUN gcc /build/hello.c -o /build/hello

#
# Run stage.
#
FROM quay.io/gravitational/debian-tall:0.0.1

COPY --from=0 /build/hello /hello
ENTRYPOINT ["/hello"]
Notice how we copy the resulting binary from the first stage of the build. Let's build v3 of our image:
$ docker build -f multi.dockerfile -t prod:v3 .
$ docker run prod:v3
If you query docker images now, you'll see that v3 version of our image is same size as v2.
NOTE: This example demonstration will only work on Linux.
It is quite easy to leave orphaned processes running in the background.
Let's launch a simple container:
$ docker run busybox sleep 10000Now, let's open a separate terminal and locate the process:
$ ps uax | grep sleep
sasha    14171  0.0  0.0 139736 17744 pts/18   Sl+  13:25   0:00 docker run busybox sleep 10000
root     14221  0.1  0.0   1188     4 ?        Ss   13:25   0:00 sleep 10000
As you see there are in fact two processes: docker run and sleep 1000 running in a container.
Let's send kill signal to the docker run (just as CI/CD job would do for long running processes):
$ kill 14171However, docker run process has not exited, and sleep process is running!
$ ps uax | grep sleep
sasha    14171  0.0  0.0 139736 17744 pts/18   Sl+  13:25   0:00 docker run busybox sleep 10000
root     14221  0.1  0.0   1188     4 ?        Ss   13:25   0:00 sleep 10000
Yelp engineers have a good answer for why this happens here:
The Linux kernel applies special signal handling to processes which run as PID 1. When processes are sent a signal on a normal Linux system, the kernel will first check for any custom handlers the process has registered for that signal, and otherwise fall back to default behavior (for example, killing the process on SIGTERM).
However, if the process receiving the signal is PID 1, it gets special treatment by the kernel; if it hasn't registered a handler for the signal, the kernel won't fall back to default behavior, and nothing happens. In other words, if your process doesn't explicitly handle these signals, sending it SIGTERM will have no effect at all.
Let's enter our container and see for ourselves:
$ docker ps
CONTAINER ID        IMAGE               COMMAND             CREATED             STATUS              PORTS               NAMES
06703112d6ac        busybox             "sleep 10000"       5 minutes ago       Up 5 minutes                            nervous_jennings
$ docker exec -ti 06703112d6ac /bin/sh
$ ps -ef
PID   USER     TIME  COMMAND
    1 root      0:00 sleep 10000
   12 root      0:00 /bin/sh
   18 root      0:00 ps -ef
Indeed, the sleep command is running as PID 1, and since it does not explicitly register any signal handlers, our TERM signal gets ignores. Let's kill the container:
$ docker kill 06703112d6acTo solve this (and other) issues, you need a simple init system that has proper signal handlers specified. Luckily, Yelp engineers built a simple and lightweight init system, dumb-init:
$ docker run quay.io/gravitational/debian-tall /usr/bin/dumb-init /bin/sh -c "sleep 10000"If you send SIGTERM signal to the docker run process now, it will handle shutdown properly.
Kubernetes Pod is a building block that by itself does not provide any durability guarantees. As Kubernetes docs say, a pod won't survive scheduling failures, node failures, or other evictions, for example due to lack of resources.
For example, let's create a single nginx pod:
$ cd prod/pod
$ kubectl create -f pod.yaml
$ kubectl get pods
NAME    READY   STATUS    RESTARTS   AGE
nginx   1/1     Running   0          18s
This pod will keep running, for now. It will also restart in case its container crashes, provided it has an appropriate restart policy. However, in the event a node goes down or starts running out of resources triggering evictions, the pod will be lost. Let's delete it now:
$ kubectl delete pod/nginx
$ kubectl get pods
No resources found.
The pod is gone.
Do not use pods directly in production. Instead, you should almost always use controllers that provide self-healing on the cluster scope - there are plenty to choose from: Deployments, ReplicaSets, DaemonSets, StatefulSets and so on.
Even for singletons, use Deployment with replication factor 1, which will guarantee that pods will get rescheduled and survive eviction or node loss:
$ kubectl create -f deploy.yaml
$ kubectl get pods
NAME                     READY   STATUS    RESTARTS   AGE
nginx-65f88748fd-w2klm   1/1     Running   0          19s
If we delete the pod now, it will get rescheduled right back on:
$ kubectl delete pod/nginx-65f88748fd-w2klm
pod "nginx-65f88748fd-w2klm" deleted
$ kubectl get pods
NAME                     READY   STATUS    RESTARTS   AGE
nginx-65f88748fd-fd2sk 1/1 Running 0 4sNOTE: You need to have executed eval $(minikube docker-env) command for the following to work properly.
$ cd prod/background
$ export registry=$(kubectl get svc/registry -ojsonpath="{.spec.clusterIP}")
$ docker build -t $registry:5000/background:0.0.1 .
$ docker push $registry:5000/background:0.0.1
$ kubectl create -f crash.yaml
$ kubectl get pods
NAME      READY     STATUS    RESTARTS   AGE
crash     1/1       Running   0          5s
Our container was supposed to start a simple Python web server on port 5000. The container appears to be running, but let's check if the server is running there:
$ kubectl exec -ti crash /bin/bash
root@crash:/# ps uax
USER       PID %CPU %MEM    VSZ   RSS TTY      STAT START   TIME COMMAND
root         1  0.0  0.0  21748  1596 ?        Ss   00:17   0:00 /bin/bash /start.sh
root         6  0.0  0.0   5916   612 ?        S    00:17   0:00 sleep 100000
root         7  0.0  0.0  21924  2044 ?        Ss   00:18   0:00 /bin/bash
root        11  0.0  0.0  19180  1296 ?        R+   00:18   0:00 ps uax
The server is not running because we made a mistake in our script, however the container itself is happily running.
Using Probes
The first obvious fix is to use a proper init system and monitor the status of the web service. However, let's use this as an opportunity to use liveness probes:
apiVersion: v1
kind: Pod
metadata:
  name: fix
  namespace: default
spec:
  containers:
  - command: ['/start.sh']
    image: localhost:5000/background:0.0.1
    name: server
    imagePullPolicy: Always
    livenessProbe:
      httpGet:
        path: /
        port: 5000
      timeoutSeconds: 1
$ kubectl create -f fix.yamlOur Python HTTP server still crashes, however this time the liveness probe will fail and the container will get restarted.
$ kubectl get pods
NAME      READY     STATUS    RESTARTS   AGE
crash     1/1       Running   0          11m
fix       1/1       Running   1          1m
An even better solution would be avoid using background processes inside containers. Instead, decouple services from each other by running them in separate containers (process per container) and if they need to run as a single "entity", colocate them in a single pod.
This approach has many benefits, including easier resources monitoring, ease of use and efficiency resulting in more light-weight and reusable infrastructure.
When configuring logging for your application running inside a container, make sure the logs go to standard output:
$ kubectl create -f logs/logs.yaml
$ kubectl logs logs
hello, world!
Kubernetes and Docker have a system of plugins to make sure logs sent to stdout and stderr will get collected, forwarded and rotated.
NOTE: This is one of the patterns of The Twelve Factor App and Kubernetes supports it out of the box!
Every time you write something to a container's filesystem, it activates the copy-on-write strategy. This approach is what makes containers efficient.
The way it works is, all layers in a Docker image are read-only. When a container starts, a thin writable layer is added on top of its other read-only layers. Any changes the container makes to the filesystem are stored there and files that do not change never get copied to that writable layer, which makes it as small as possible.
When an existing file in a container is modified, the storage driver (devicemapper, overlay or others) performs a copy-on-write operation and copies that file to the writable layer. In case of active usage, it can put a lot of stress on a storage driver, especially in case of Devicemapper or BTRFS.
For write-heavy applications it is recommended to not store data in the container but rather make sure that containers write data only to volumes which are independent of a running container and designed for I/O efficiency.
For non-persistent data, Kubernetes provides a special volume type called emptyDir:
apiVersion: v1
kind: Pod
metadata:
  name: test-pd
spec:
  containers:
  - image: busybox
    name: test-container
    volumeMounts:
    - mountPath: /tmp
      name: tempdir
  volumes:
  - name: tempdir
    emptyDir: {}
By default the volume is backed by whatever disk is backing the node, however note that it is cleared permanently if the pod leaves the node for whatever reason (it persists across container restarts within a pod though).
For small files it may be beneficial to set emptyDir.medium field to Memory which will make Kubernetes use a RAM-backed filesystem, tmpfs instead.
It is not recommended to use use latest tag in production as it creates ambiguity. For example, looking at tha "latest" tag, it is not possible to tell which version of the application is actually running.
It is ok to use latest for development purposes, although make sure you set imagePullPolicy to Always, to make sure Kubernetes always pulls the latest version when creating a pod:
apiVersion: v1
kind: Pod
metadata:
  name: always
  namespace: default
spec:
  containers:
  - command: ['/bin/sh', '-c', "echo hello, world!"]
    image: busybox:latest
    name: server
imagePullPolicy: AlwaysImagine a situation when your container takes some time to start.
To simulate this, we are going to write a simple script:
#!/bin/bash

echo "Starting up"
sleep 30
echo "Started up successfully"
python -m http.server 5000
NOTE: You need to have executed eval $(minikube docker-env) command for the following to work properly.
Push the image and start service and deployment:
$ cd prod/delay
$ export registry=$(kubectl get svc/registry -ojsonpath="{.spec.clusterIP}")
$ docker build -t $registry:5000/delay:0.0.1 .
$ docker push $registry:5000/delay:0.0.1
$ kubectl create -f service.yaml
$ kubectl create -f deployment.yaml
Enter curl container inside the cluster and make sure it all works:
$ kubectl run -ti --rm cli --image=appropriate/curl --restart=Never --command /bin/sh
$ curl http://delay:5000
<!DOCTYPE html>
...
You will notice that there's a connection refused error, when you try to access it
for the first 30 seconds.
Update deployment to simulate deploy:
$ docker build -t $registry:5000/delay:0.0.2 .
$ docker push $registry:5000/delay:0.0.2
$ kubectl replace -f deployment-update.yaml
In the next window, let's try to see if we got any service downtime:
$ curl http://delay:5000
curl: (7) Failed to connect to delay port 5000: Connection refused
We've got a production outage despite setting maxUnavailable: 0 in our rolling update strategy!
This happened because Kubernetes did not know about startup delay and readiness of the service. If we look at the list of pods, we'll see that the old pod was deleted immediately after the new one has been created thus leaving us w/o a functioning service for the next 30 seconds:
$ kubectl get podsLet's fix that by using readiness probe:
readinessProbe:
  httpGet:
    path: /
    port: 5000
  timeoutSeconds: 1
  periodSeconds: 5
Readiness probe indicates the readiness of the pod containers and Kubernetes will take this into account when doing a deployment:
$ kubectl replace -f deployment-fix.yamlThis time, if we observe output from kubectl get pods, we'll see that there will be two pods running and the old pod will start terminating only when the second one becomes ready:
$ kubectl get pods
NAME                        READY   STATUS    RESTARTS   AGE
delay-5fb9c6fb8b-prw86      1/1     Running   0          2m15s
delay-f7f84dff9-m5hw7       0/1     Running   0          3s
And the curl command consistently works while the service is being redeployed.
Kubernetes provides a useful tool to schedule containers to perform one-time task: jobs.
However, there is a problem:
apiVersion: batch/v1
kind: Job
metadata:
  name: bad
spec:
  template:
    metadata:
      name: bad
    spec:
      restartPolicy: Never
      containers:
      - name: box
        image: busybox
        command: ["/bin/sh", "-c", "exit 1"]
$ cd prod/jobs
$ kubectl create -f bad.yamlYou are going to observe the race to create hundreds of containers for the job retrying forever:
$ kubectl describe jobs
Name:		bad
Namespace:	default
Image(s):	busybox
Selector:	controller-uid=18a6678e-11d1-11e7-8169-525400c83acf
Parallelism:	1
Completions:	1
Start Time:	Sat, 25 Mar 2017 20:05:41 -0700
Labels:		controller-uid=18a6678e-11d1-11e7-8169-525400c83acf
		job-name=bad
Pods Statuses:	1 Running / 0 Succeeded / 24 Failed
No volumes.
Events:
  FirstSeen	LastSeen	Count	From			SubObjectPath	Type		Reason			Message
  ---------	--------	-----	----			-------------	--------	------			-------
  1m		1m		1	{job-controller }			Normal		SuccessfulCreate	Created pod: bad-fws8g
  1m		1m		1	{job-controller }			Normal		SuccessfulCreate	Created pod: bad-321pk
  1m		1m		1	{job-controller }			Normal		SuccessfulCreate	Created pod: bad-2pxq1
  1m		1m		1	{job-controller }			Normal		SuccessfulCreate	Created pod: bad-kl2tj
  1m		1m		1	{job-controller }			Normal		SuccessfulCreate	Created pod: bad-wfw8q
  1m		1m		1	{job-controller }			Normal		SuccessfulCreate	Created pod: bad-lz0hq
  1m		1m		1	{job-controller }			Normal		SuccessfulCreate	Created pod: bad-0dck0
  1m		1m		1	{job-controller }			Normal		SuccessfulCreate	Created pod: bad-0lm8k
  1m		1m		1	{job-controller }			Normal		SuccessfulCreate	Created pod: bad-q6ctf
  1m		1s		16	{job-controller }			Normal		SuccessfulCreate	(events with common reason combined)
Probably not the result you expected. Over time, the jobs will accumulate and the load on the nodes and Docker will be quite substantial, especially if the job is failing very quickly.
Let's clean up the busy failing job first:
$ kubectl delete jobs/badNow let's use activeDeadlineSeconds to limit amount of retries:
apiVersion: batch/v1
kind: Job
metadata:
  name: bound
spec:
  activeDeadlineSeconds: 30
  template:
    metadata:
      name: bound
    spec:
      restartPolicy: Never
      containers:
      - name: box
        image: busybox
        command: ["/bin/sh", "-c", "exit 1"]
$ kubectl create -f bound.yamlNow you will see that after 30 seconds, the job has failed and no more pods will be created:
11s 11s 1 {job-controller } Normal DeadlineExceeded Job was active longer than specified deadlineNOTE: Sometimes it makes sense to retry forever. In this case make sure to set a proper pod restart policy to protect from accidental DDOS on your cluster.
One of important Kubernetes features is resource management. Kubernetes allows you to configure CPU/RAM resource quotas for containers to ensure that no single container can starve the entire system.
Suppose we have a container that tends to hog memory:
$ cd prod/quotas
$ docker build -t $registry:5000/memhog:0.0.1 .
$ docker push $registry:5000/memhog:0.0.1
$ kubectl create -f quota.yaml
The container consumes about 100 megabytes of memory but the limit we set on our pod allows only 20. Let's see how Kubernetes handled it:
$ kubectl get pods/quota
quota                       0/1     OOMKilled          1          4s
Kubernetes's OOM killer killed the container, so if the application running inside it leaks memory gradually, it will restart.
Kubernetes also allows you to configure quotas per namespace and uses an intelligent scheduling algorithm to ensure that pods are distributed across the cluster nodes appropriately. For example, it won't schedule a pod on a node if that pod's quota request exceeds resources available on the node.
Proper quotas configuration is mandatory for ensuring smooth sailing in production. Check these Kubernetes resources for more information:
https://kubernetes.io/docs/tasks/configure-pod-container/assign-memory-resource/ https://kubernetes.io/docs/tasks/configure-pod-container/assign-cpu-resource/
Often an application needs a configuration file to run. It might be tempting to just put the configuration file alongside your program inside the container:
$ cd prod/config
$ docker build -t $registry:5000/config:0.0.1 -f config.dockerfile .
$ docker push $registry:5000/config:0.0.1
$ kubectl create -f pod.yaml
This approach has a number of drawbacks. For example, what if we want to update the configuration? There's no easy way to do that inside the running container. Another concern is what if configuration file contains some sensitive information such as passwords or API keys?
Kubernetes provides an elegant way to deal with these issues by using ConfigMaps. A ConfigMap is a Kubernetes resource that can be mounted inside a running container (or multiple containers). Let's create a ConfigMap out of our configuration file:
$ kubectl create configmap config --from-file=config.yaml
$ kubectl get configmaps/config -oyaml
We can see that Kubernetes converted our configuration file into a ConfigMap. Let's now rebuild our image to remove embedded configuration file and update the pod to use ConfigMap:
$ docker build -t $registry:5000/config:0.0.1 -f config-fix.dockerfile .
$ docker push $registry:5000/config:0.0.1
$ kubectl delete -f pod.yaml
$ kubectl create -f pod-fix.yamlIn this example we will explore a more generic production pattern that's not necessarily Kubernetes-specific but we'll be using our local Kubernetes cluster to play with it. The pattern is called "circuit breaker".
Our web application is an imaginary web server for email. To render the page, our frontend has to make two requests to the backend:
- Talk to the weather service to get current weather.
- Fetch current mail from the database.
We will make the following assumptions:
- The weather service is auxiliary and its downtime shouldn't affect the whole system.
- The mail service is critical and users should still be able to view mail if weather service is down.
Here is our frontend, weather and mail services written in Python:
Weather Service Backend
from flask import Flask
app = Flask(__name__)

@app.route("/")
def hello():
    return '''Pleasanton, CA
Saturday 8:00 PM
Partly Cloudy
12 C
Precipitation: 9%
Humidity: 74%
Wind: 14 km/h
'''

if __name__ == "__main__":
    app.run(host='0.0.0.0')
Mail Service Backend
from flask import Flask,jsonify
app = Flask(__name__)

@app.route("/")
def hello():
    return jsonify([
        {"from": "<bob@example.com>", "subject": "lunch at noon tomorrow"},
        {"from": "<alice@example.com>", "subject": "compiler docs"}])

if __name__ == "__main__":
    app.run(host='0.0.0.0')
Frontend
from flask import Flask
import requests
from datetime import datetime
app = Flask(__name__)

@app.route("/")
def hello():
    weather = "weather unavailable"
    try:
        print "requesting weather..."
        start = datetime.now()
        r = requests.get('http://weather')
        print "got weather in %s ..." % (datetime.now() - start)
        if r.status_code == requests.codes.ok:
            weather = r.text
    except:
        print "weather unavailable"

    print "requesting mail..."
    r = requests.get('http://mail')
    mail = r.json()
    print "got mail in %s ..." % (datetime.now() - start)

    out = []
    for letter in mail:
        out.append("<li>From: %s Subject: %s</li>" % (letter['from'], letter['subject']))


    return '''<html>
<body>
  <h3>Weather</h3>
  <p>%s</p>
  <h3>Email</h3>
  <p>
    <ul>
      %s
    </ul>
  </p>
</body>
''' % (weather, '<br/>'.join(out))

if __name__ == "__main__":
    app.run(host='0.0.0.0')
Let's create our deployments and services:
$ cd prod/cbreaker
$ export registry=$(kubectl get svc/registry -ojsonpath="{.spec.clusterIP}")
$ docker build -t $registry:5000/mail:0.0.1 .
$ docker push $registry:5000/mail:0.0.1
$ kubectl apply -f service.yaml
deployment "frontend" configured
deployment "weather" configured
deployment "mail" configured
service "frontend" configured
service "mail" configured
service "weather" configured
Check that everything is running smoothly:
$ kubectl run -ti --rm cli --image=appropriate/curl --restart=Never --command /bin/sh
$ curl http://frontend
<html>
<body>
  <h3>Weather</h3>
  <p>Pleasanton, CA
Saturday 8:00 PM
Partly Cloudy
12 C
Precipitation: 9%
Humidity: 74%
Wind: 14 km/h
</p>
  <h3>Email</h3>
  <p>
    <ul>
      <li>From: <bob@example.com> Subject: lunch at noon tomorrow</li><br/><li>From: <alice@example.com> Subject: compiler docs</li>
    </ul>
  </p>
</body>
Let's introduce weather service that crashes:
from flask import Flask
app = Flask(__name__)

@app.route("/")
def hello():
    raise Exception("I am out of service")

if __name__ == "__main__":
    app.run(host='0.0.0.0')
Build and redeploy:
$ docker build -t $registry:5000/weather-crash:0.0.1 -f weather-crash.dockerfile .
$ docker push $registry:5000/weather-crash:0.0.1
$ kubectl apply -f weather-crash.yaml
deployment "weather" configured
Let's make sure that it is crashing:
$ kubectl run -ti --rm cli --image=appropriate/curl --restart=Never --command /bin/sh
$ curl http://weather
<!DOCTYPE HTML PUBLIC "-//W3C//DTD HTML 3.2 Final//EN">
<title>500 Internal Server Error</title>
<h1>Internal Server Error</h1>
<p>The server encountered an internal error and was unable to complete your request.  Either the server is overloaded or there is an error in the application.</p>
However our frontend should be all good:
$ kubectl run -ti --rm cli --image=appropriate/curl --restart=Never --command /bin/sh
$ curl http://frontend
<html>
<body>
  <h3>Weather</h3>
  <p>weather unavailable</p>
  <h3>Email</h3>
  <p>
    <ul>
      <li>From: <bob@example.com> Subject: lunch at noon tomorrow</li><br/><li>From: <alice@example.com> Subject: compiler docs</li>
    </ul>
  </p>
</body>
Everything is working as expected! There is one problem though, we have just observed the service is crashing quickly, let's see what happens if our weather service is slow. This happens way more often in production, e.g. due to network or database overload.
To simulate this failure we are going to introduce an artificial delay:
from flask import Flask
import time

app = Flask(__name__)

@app.route("/")
def hello():
    time.sleep(30)
    raise Exception("System overloaded")

if __name__ == "__main__":
    app.run(host='0.0.0.0')
Build and redeploy:
$ docker build -t $registry:5000/weather-crash-slow:0.0.1 -f weather-crash-slow.dockerfile .
$ docker push $registry:5000/weather-crash-slow:0.0.1
$ kubectl apply -f weather-crash-slow.yaml
deployment "weather" configured
Just as expected, our weather service is timing out now:
$ kubectl run -ti --rm cli --image=appropriate/curl --restart=Never --command /bin/sh
$ curl http://weather
<!DOCTYPE HTML PUBLIC "-//W3C//DTD HTML 3.2 Final//EN">
<title>500 Internal Server Error</title>
<h1>Internal Server Error</h1>
<p>The server encountered an internal error and was unable to complete your request.  Either the server is overloaded or there is an error in the application.</p>
The problem though, is that every request to frontend takes 10 seconds as well:
$ curl http://frontendThis is a much more common type of outage - users leave in frustration as the service is unavailable.
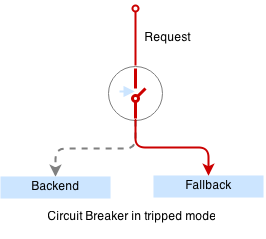
To fix this issue we are going to introduce a special proxy with circuit breaker.
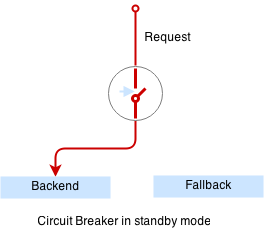
Circuit breaker is a special middleware that is designed to provide a fail-over action in case the service has degraded. It is very helpful to prevent cascading failures - where the failure of the one service leads to failure of another. Circuit breaker observes requests statistics and checks the stats against a special error condition.
Here is our simple circuit breaker written in python:
from flask import Flask
import requests
from datetime import datetime, timedelta
from threading import Lock
import logging, sys


app = Flask(__name__)

circuit_tripped_until = datetime.now()
mutex = Lock()

def trip():
    global circuit_tripped_until
    mutex.acquire()
    try:
        circuit_tripped_until = datetime.now() + timedelta(0,30)
        app.logger.info("circuit tripped until %s" %(circuit_tripped_until))
    finally:
        mutex.release()

def is_tripped():
    global circuit_tripped_until
    mutex.acquire()
    try:
        return datetime.now() < circuit_tripped_until
    finally:
        mutex.release()


@app.route("/")
def hello():
    weather = "weather unavailable"
    try:
        if is_tripped():
            return "circuit breaker: service unavailable (tripped)"

        r = requests.get('http://localhost:5000', timeout=1)
        app.logger.info("requesting weather...")
        start = datetime.now()
        app.logger.info("got weather in %s ..." % (datetime.now() - start))
        if r.status_code == requests.codes.ok:
            return r.text
        else:
            trip()
            return "circuit breaker: service unavailable (tripping 1)"
    except:
        app.logger.info("exception: %s", sys.exc_info()[0])
        trip()
        return "circuit breaker: service unavailable (tripping 2)"

if __name__ == "__main__":
    app.logger.addHandler(logging.StreamHandler(sys.stdout))
    app.logger.setLevel(logging.DEBUG)
    app.run(host='0.0.0.0', port=6000)
Let's build and redeploy our circuit breaker:
$ docker build -t $registry:5000/cbreaker:0.0.1 -f cbreaker.dockerfile .
$ docker push $registry:5000/cbreaker:0.0.1
$ kubectl apply -f weather-cbreaker.yaml
deployment "weather" configured
$ kubectl apply -f weather-service.yaml
service "weather" configured
Circuit breaker runs as a separate container next to the weather service container in the same pod:
$ cat weather-cbreaker.yamlNote that we have reconfigured our service so requests are handled by the circuit breaker first which forwards requests to the weather service running in the same pod, and trips if the request fails.
The circuit breaker will detect the service outage and the auxilliary weather service will not bring our mail service down anymore:
$ kubectl run -ti --rm cli --image=appropriate/curl --restart=Never --command /bin/sh
$ curl http://frontend
<html>
<body>
  <h3>Weather</h3>
  <p>circuit breaker: service unavailable (tripped)</p>
  <h3>Email</h3>
  <p>
    <ul>
      <li>From: <bob@example.com> Subject: lunch at noon tomorrow</li><br/><li>From: <alice@example.com> Subject: compiler docs</li>
    </ul>
  </p>
</body>
NOTE: There are some production level proxies that natively support circuit breaker pattern - such as Vulcand, Nginx Plus or Envoy
In the previous example we used a pattern called a "sidecar container". A sidecar is a container colocated with other containers in the same pod, which adds additional logic to the service, such as error detection, TLS termination and other features.
Here is an example of sidecar nginx proxy that adds rate and connection limits:
$ cd prod/sidecar
$ docker build -t $registry:5000/sidecar:0.0.1 -f sidecar.dockerfile .
$ docker push $registry:5000/sidecar:0.0.1
$ docker build -t $registry:5000/service:0.0.1 -f service.dockerfile .
$ docker push $registry:5000/service:0.0.1
$ kubectl apply -f sidecar.yaml
deployment "sidecar" configured
Try to hit the service faster than one request per second and you will see the rate limiting in action:
$ kubectl run -ti --rm cli --image=appropriate/curl --restart=Never --command /bin/sh
$ curl http://sidecar
For instance, Istio is an example of platform that embodies this design.