This demo utilizes Meraki MV Sense camera data in conjunction with Meraki CMX access point data to output human consumable information and correlations regarding activities such as number of visits, busiest times in a day, number of people etc. It has relevant use cases for asset utilization tracking, customer activity tracking, and much more.
Streaming data from MV sense and CMX are stored in local files and are then utilized for further analysis and formatting.
To obtain the real-time data from the cameras and send it to the demo application, the MQTT protocol is used which requires some configuration as shown below.
To obtain the location information from mobile devices that is used in the demo, the Location Scanning API is used.
A web GUI is used to display and interact with the data.
This demo also implements a simplified dashboard that focuses on showing the number of visitors on each camera in a Network divided by zones and zooming into a particular zone to see hourly details and relevant camera snapshots. The data for the simplified dashboards in the "MV Overview" tab comes from the Meraki Dashboard REST API, specifically the MV Sense camera analytics overview and the Camera Analytics Zone History REST API calls.

If you are only interested in this simplified dashboard that consumes historical people count data from the Meraki Cloud, you do not need to configure the MQTT broker to get live MV Sense camera data nor the CMX configuration and CMX receiver info as seen below; you just need to configure the Network ID and API key in the setup pages. You also con skip running the cmxreceiver.py and mvSense.py scripts below since those capture date for the rest of the pages in the demo.
Screenshots for the rest of the pages here: MerakiMVMandAnalytics Screenshots
There are 3 main functionalities in this repository:
The cmxreceiver.py program receives streams of cmx data from Meraki access points and saves this data in cmxData.csv.
The mvSense.py program receives streams of MV Sense data from Meraki video cameras and stores this data in mvData.csv.
The flaskApp.py then utilizes functions in compute.py to analyze and format the data into a web application.
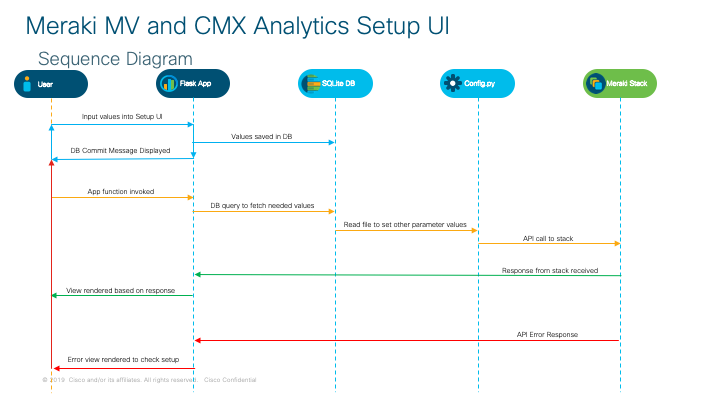
Configuration UI (http://0.0.0.0:5001/setup) provides user option to input Meraki API Key, Network ID, Camera Serial #, Validator, and AP MAC Address. These values are stored in the application's SQLite database that is hosted locally on the user's endpoint. Other configuration parameters can be configured from the config.py file. If there is an error in the API configuration, the user will receive a prompt to check configuration and input correct values. The image below illustrates how this interaction works:
Config.py contains all of the other global variables and configuration needed throughout the code, including keys and thresholds.
Leverage Meraki new camera API and MQTT capability to create a notification service. When the camera detects a person consistently appears in a particular zone the service will send a Webex team message to a Webex team room with a video link which will directly go to the video footage when that even occurred. This is useful for alerting unexpected person movement in off-hours. Here is more information on MV sense data: https://developer.cisco.com/meraki/build/mv-sense-documentation/
—— MQTT and setting ——
- In the Meraki dashboard, go to Cameras > {Camera Name} > Settings > Sense page.
- Click Add or edit MQTT Brokers > New MQTT Broker and add you broker information. For testing/trial you can find public broker at here.
- You can install MQTT.fx to subscribe to MQTT broker. This is a very useful tool
—— MV Sense Configuration ——
- In the config.py file, there is a section for “variables utilized in mvSense.py” which contains all of the config variables for the MV Sense data gathering code
- MQTT_SERVER is the MQTT broker ip or domain ("test.mosquitto.org" for example)
- MQTT_PORT is the MQTT broker port being utilized (usually 1883)
- MQTT_TOPIC is the top of the Meraki camera Matt, boy default it is “/merakimv/#”
- MERAKI_API_KEY is the Meraki Api key for organization > user updates this in Configuration UI
- NETWORK_ID is Camera's network ID, will use this get video link with camera api > user updates this in Configuration UI
- COLLECT_CAMERAS_SERIAL_NUMBERS is the array of cameras serial numbers, for all of there cameras use * > user updates this in Configuration UI
- COLLECT_ZONE_IDS is Array of camera zone id, all is *
- MOTION_ALERT_PEOPLE_COUNT_THRESHOLD is the minimum number of people detected in camera to trigger the start of an activity
- MOTION_ALERT_ITERATE_COUNT is the minimum number of mqtt messages counted to indicate that an activity has successfully occurred
- MOTION_ALERT_TRIGGER_PEOPLE_COUNT is the minimum number of people needed to successfully complete and activity
- MOTION_PAUSE_TIME is the pause time after alert finished triggering
- TIMEOUT is the number of messages until action times out due to in activity (will then check whether minimum alert iterate count is met to determine activity success)
——------ CMX Access point Setup ------—— Cisco Meraki CMX Receiver is asimple example demonstrating how to interact with the CMX API. How it works:
- Meraki access points will listen for WiFi clients that are searching for a network to join and log the events.
- The "observations" are then collected temporarily in the cloud where additional information can be added to the event, such as GPS, X Y coordinates and additional client details.
- Meraki will first send a GET request to this CMX receiver, which expects to receive a "validator" key that matches the Meraki network's validator.
- Meraki will then send a JSON message to this application's POST URL
- The JSON is checked to ensure it matches the expected secret, version and observation device type.
- The resulting data is sent to the "save_data(data)" function where it can be sent to a database or other service
- This example will simply print the CMX data to the console. Default port: 5000 Cisco Meraki CMX Documentation https://documentation.meraki.com/MR/Monitoring_and_Reporting/CMX_Analytics#CMX_Location_API
—— CMX Configuration ——
- In the config.py file, there is a section for “Variables utilized in cmxreceiver.py” which contains all of the config variables for the cmx data gathering code
- Validator is the validator key that can be found in the Meraki dashboard by navigating to **Network-wide > General
- Scroll down to “Location and Analytics” to copy and paste this validator key into code (ensure analytics and scanning API are enabled)
- _RSSI_THRESHOLD is the minimum rssi value needed for a device to be written into database (rssi is the signal strength of the device seen by the access point
- _APMACADDR is the MAC address of the desired access point to gather data from user updates in Configuration UI
—— Access Point setting ——
- Download ngrok which is used to create public URLs for programs (more information here: https://ngrok.com)
- Use ngrok to expose port 5000 by entering ‘./ngrok http 5000’ into terminal
- You should see a url created that looks similar to this ‘https://2a6eed03.ngrok.io/'
- Copy and paste this url into the “Post URL” section of “Location and Analytics” in the Meraki Dashboard
- Note that the validate button should fail at this point as the the cmx receiver is not up and running
——------ Computing Configuration ------——
- In the config.py file, there is a section for “Variables utilized in compute.py"
- _FILTER_TIME is the number of seconds in which devices will not be displayed if total time seen by cmx data is over this threshold
- _SESSION_TIME is the number of seconds between cmx timestamps which is still considered to be the same session of activity (as sometimes gaps in streaming data can happens but this does not necessarily mean device has left and come back)
- timeWindow defines a leeway period before inTime and after outTime of mvSense data in which cmx data should still be considered, as the times may not exactly match up due to granularity differences
- rssiThreshold defines minimum signal strength to be considered in correlation with mvSense data and cmx data
——------ Running Code ------——
- Make sure Python is installed
- Make sure pip is installed (https://pip.pypa.io/en/stable/installing/ for more information on pip)
- Enter 'pip install -r requirements.txt' into command line to download necessary libraries
- Ensure all elements of the config.py file are completed
- Ensure ngrok is running and that the url matches what is in the Meraki Dashboard (./ngrok http 5000)
- In a new terminal window, enter ‘python3.7 cmxreceiver.py’ (note at this point the validate button in the Meraki dashboard should be working, data will stream every minute or so)
- In a new terminal window, enter ‘python3.7 mvSense.py’ (connection should be made with MQTT server and data should start streaming)
- To run the flask application, enter ‘python flaskApp.py’ in another terminal window and navigate your browser to the given url address (http://0.0.0.0:5001)
- App will query setup table in DB. If values throw an API call error when using app, user will be prompted to check configuration and input correct values.